Detailed description of software upgrade
This article introduces how to burn the firmware file on the host into the flash memory of the development board through the Type-C data cable. When upgrading, you need to select an appropriate upgrade method according to the host operating system and firmware type.
Ready to work
Equipment and environment
AIO-RK3328-JD4 development board
firmware
Host
Good Type-C data cable
Note: There are generally two types of firmware files:
A single unified firmware update.img packs the boot loader, parameters and all partition images together for firmware release.
Multiple partition images, Linux system has uboot.img, boot.img, rootfs.img; Android system has kernel.img.system.img, etc., which are all generated during the development phase
Note: The host operating system supports:
Windows XP (32/64 bit)
Windows 7 (32/64 bit)
Windows 8 (32/64 bit)
Linux (32/64 bit)
Install RK USB driver
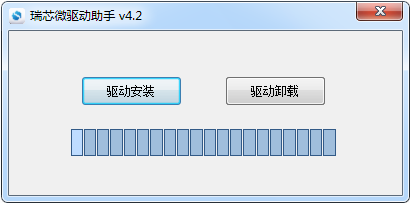
Download Release_DriverAssistant.zip, unzip, and then run DriverInstall.exe inside. In order to use the updated drivers for all devices, please select 'Driver Uninstallation' first, and then select 'Driver Installation'.

Device mode
There are two ways to make the device enter the upgrade mode
One method is to disconnect the power adapter and the Type-C data cable first:
One end of the USB data cable is connected to the host, and the Type-C end is connected to the Type-C female port of the development board.
Press and hold the RECOVERY button on the device.
Connect to power
After about two seconds, release the RECOVERY button.
Another method, without disconnecting the power adapter and Type-C data cable:
One end of the USB data cable is connected to the host, and the Type-C end is connected to the Type-C female port of the development board.
Press and hold the RECOVERY button on the device.
Briefly press the RESET button.
After about two seconds, release the RECOVERY button
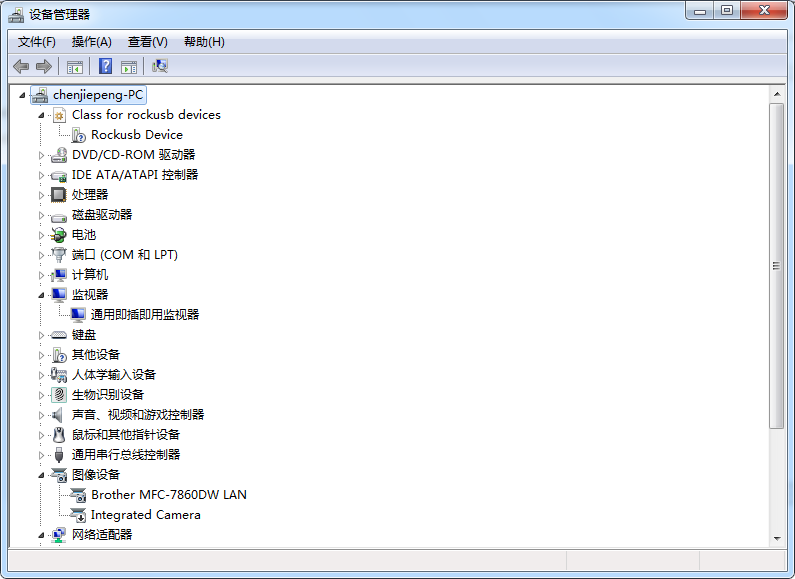
The host should be prompted to find new hardware and configure the driver. Open the device manager, you will see the new device 'Rockusb Device' appears, as shown in the figure below. If not, you need to go back to the previous step to reinstall the driver.

Firmware download
Firmware download page
Burning tool download
Under Windows: AndroidTool_v2.58
Under Linux: Upgrade_Tool_v1.34
Windows upgrade
After downloading the AndroidTool tool, unzip it and run the AndroidTool.exe inside (note that if it is Windows 7/8, you need to press the right mouse button and choose to run as administrator)
Burn unified firmware update.img
The steps to flash the unified firmware update.img are as follows:
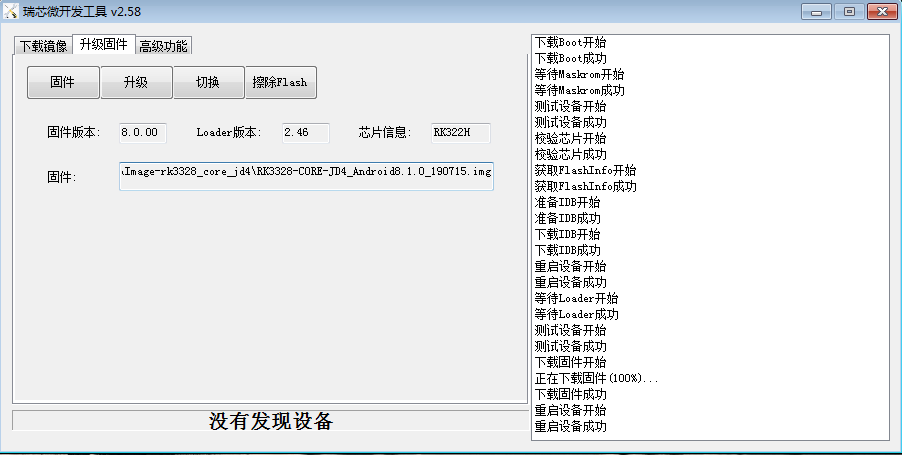
Switch to the 'Upgrade Firmware' page.
Press the 'Firmware' button to open the firmware file to be upgraded. The upgrade tool will display detailed firmware information.
Press the 'Upgrade' button to start the upgrade.

If the upgrade fails, it may be because the laoder version of the firmware you burned is inconsistent with the original machine. You can try to erase the Flash by pressing the 'Erase Flash' button first, and then upgrade.
Note: 'Erase Flash' must be erased according to 'Programming Instructions'
Burn partition image
The partition of each firmware may be different, please note:
When using Androidtool_2.58 to burn Android8.1 partition image, it needs to be executed according to the partition described in parameter.txt,
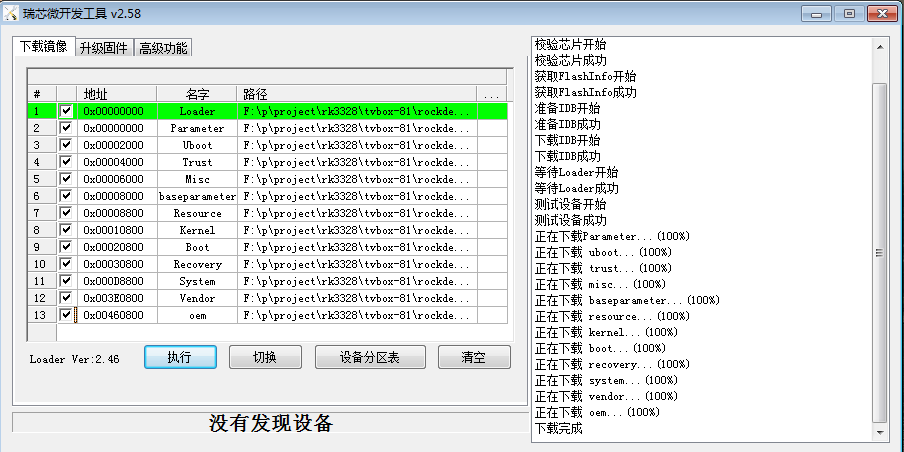
Switch to 'download mirror page'; right click on the table, select 'import configuration'; select rk3328-Android81.cfg
The steps to flash the partition image are as follows:
Switch to the 'Download Mirror' page.
Tick the partition to be burned, you can choose more than one.
Make sure that the path of the image file is correct. If necessary, click the blank table cell to the right of the path to select again.
Click the 'Execute' button to start the upgrade, and the device will automatically restart after the upgrade is complete.

Linux upgrade
There is no need to install the device driver under Linux, just refer to the Windows chapter to connect the device.
After downloading the Linux tool Upgrade_Tool, install it to the system as follows for easy calling:
unzip Linux_Upgrade_Tool_xxxx.zipcd Linux_UpgradeTool_xxxxsudo mv upgrade_tool /usr/local/binsudo chown root:root /usr/local/bin/upgrade_toolsudo chmod a+x /usr/local/bin/upgrade_tool
Burn unified firmware update.img:
sudo upgrade_tool uf update.img
If the upgrade fails, you can try to erase and then upgrade. Be sure to erase and program according to the table of [Programming Instructions]
# Erase flash Use the ef parameter to specify the loader file or the corresponding update.img sudo upgrade_tool ef update.img # Re-program sudo upgrade_tool uf update.img
Note: 'Erase Flash' must be erased according to 'Programming Instructions'
Flash partition image:
Android 8.1 uses the following methods:
sudo upgrade_tool ul bootloader.bin # Burn bootloadersudo upgrade_tool di -p paramater #Burn parametersudo upgrade_tool di -uboot /path/to/uboot.imgsudo upgrade_tool di -trust /path/to/trust.imgsudo upgrade_tool di -m /path/to/misc.imgsudo upgrade_tool di -baseparameter /path/to/baseparameter.imgsudo upgrade_tool di -b /path/to/boot.imgsudo upgrade_tool di -k /path/to/kernel.imgsudo upgrade_tool di -resource /path/to/resource.imgsudo upgrade_tool di -r /path/to/recovery.imgsudo upgrade_tool di -s /path/to/system.imgsudo upgrade_tool di -vendor /path/to/vendor.imgsudo upgrade_tool di -oem /path/to/oem.img
Ubuntu(GPT),Use the following way
sudo upgrade_tool ul $LOADER
sudo upgrade_tool di -p $PARAMETER
sudo upgrade_tool di -uboot $UBOOT
sudo upgrade_tool di -trust $TRUST
sudo upgrade_tool di -b $BOOT
sudo upgrade_tool di -r $RECOVERY
sudo upgrade_tool di -m $MISC
sudo upgrade_tool di -oem $OEM
sudo upgrade_tool di -userdata $USERDATA
sudo upgrade_tool di -rootfs $ROOTFS
If an error occurs during the upgrade due to flash problems, you can try low-level formatting and erasing nand flash:
sudo upgrade_tool lf update.img # low-level format sudo upgrade_tool ef update.img # erase