LQPX30 has a flexible starting method. Under normal circumstances, unless the hardware is damaged, the LQPX30 development board will not be bricked.
If an accident occurs during the upgrade process and the bootloader is damaged, making it impossible to upgrade again, you can still enter the MaskRom mode to repair it.
Loading method
LQPX30 has 32KB BootRom, 16KB internal SYSTEM_SRA and 8KB PMU_SRAM, and supports loading the system from the following devices:
eMMC interface
SDMMC interface
Serial nand flash or nor flash
In addition, LQPX30 supports downloading system code from the USB OTG interface.
Start sequence
The startup sequence is as follows:
Main control power-on initialization
The BootRom code runs on SRAM to verify the bootloader in the storage device
After the verification is passed, load and run the bootloader boot code
The bootloader boot code is responsible for initializing the DDR memory, loading the complete bootloader code into the DDR memory and running
The bootloader loads the Linux kernel on the storage device and gives the execution rights to the Linux kernel
Start mode
LQPX30 has three startup modes:
Normal mode
Loader mode
MaskRom mode
Normal mode
Normal mode is the normal startup process. Each component is loaded in turn and enters the system normally.
Loader mode
In Loader mode, the bootloader will enter the upgrade state, waiting for host commands for firmware upgrades, etc. To enter the Loader mode, the bootloader must detect that the RECOVERY button is pressed during startup and the USB is connected. The method to make the device enter the upgrade mode is as follows:
Disconnect the power adapter
The Type-C data cable connects the device and the host.
Press and hold the RECOVERY button on the device.
Plug in the power source.
After about two seconds, release the RECOVERY button.
MaskRom mode
MaskRom mode is used to repair the system when the bootloader is damaged.
Generally, it is not necessary to enter the MaskRom mode. Only when the bootloader verification fails (the IDB block cannot be read, or the bootloader is damaged), the BootRom code will enter the MaskRom mode. At this time, the BootRom code waits for the host to transmit the bootloader code through the USB interface, load and run it.
Upgrade firmware
Preface
This article introduces how to burn the firmware file on the host into the flash memory of the development board through the Type-C data cable. When upgrading, you need to select an appropriate upgrade method according to the host operating system and firmware type.
Ready to work
LQPX30 Development Board
firmware
Host
Type-C data cable
There are generally two types of firmware files:
A single unified firmware update.img packs the boot loader, parameters and all partition images together for firmware release.
Multiple partition images, such as kernel.img, rootfs.img, recovery.img, etc., are generated during the development phase.
You can find the compiled unified LQPX30 firmware here, download it and unzip it. You can also compile it yourself by referring to the instructions for compiling the firmware.
Host operating system support:
Windows XP (32/64 Bit)
Windows 7 (32/64 Bit)
Windows 8 (32/64 Bit)
Linux (32/64 Bit)
Windows
Install RK USB driver
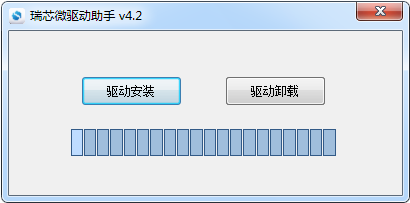
Download Release_DriverAssistant.zip, unzip, and then run DriverInstall.exe inside. In order to use the updated drivers for all devices, please select 'Driver Uninstallation' first, and then select 'Driver Installation'.

Connect the device
Follow the steps below to make the device enter the upgrade mode
Disconnect the power adapter first:
One end of the Type-C data cable is connected to the host and the other end is connected to the development board
Press and hold the RECOVERY button on the device.
Connect to power
After about two seconds, release the RECOVERY button.
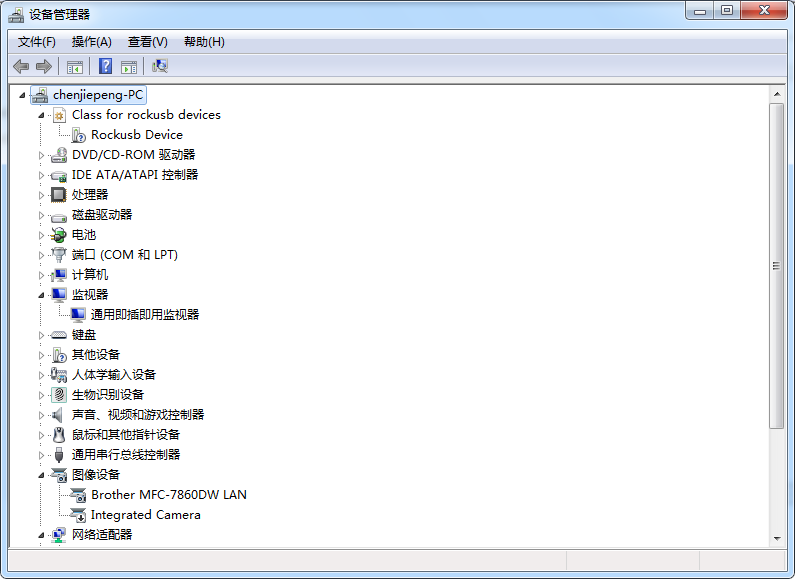
The host should be prompted to find new hardware and configure the driver. Open the device manager, you will see the new device 'Rockusb Device' appears, as shown in the figure below. If not, you need to go back to the previous step to reinstall the driver.

Burn firmware
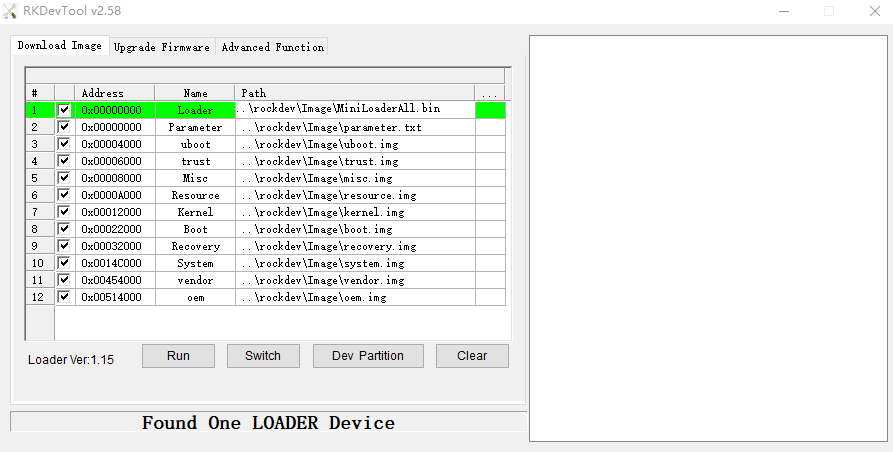
Download AndroidTool, unzip it, and run AndroidTool.exe in the AndroidTool_Release_xx directory (note that if it is Windows 7/8, you need to press the right mouse button and choose to run as an administrator), as shown in the figure below:

Burn unified firmware update.img
The steps to flash the unified firmware update.img are as follows:
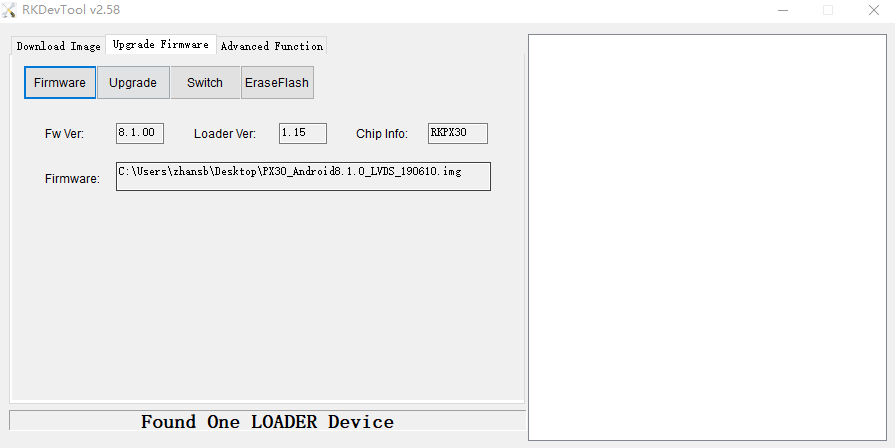
Switch to the 'Upgrade Firmware' page.
Press the 'Firmware' button to open the firmware file to be upgraded. The upgrade tool will display detailed firmware information.
Press the 'Upgrade' button to start the upgrade.
If the upgrade fails, you can try to erase the Flash by pressing the 'Erase Flash' button first, and then upgrade.
Note: If the laoder version of the firmware you burned is inconsistent with that of the original machine, please execute 'Erase Flash' before upgrading the firmware.

Burn partition image
The partition of each firmware may be different, please pay attention to the following two points:
Use Androidtool_2.58 to burn Android8.1 and use the default configuration.
The steps to flash the partition image are as follows:
Switch to the 'Download Mirror' page.
Tick the partition to be burned, you can choose more than one.
Make sure that the path of the image file is correct. If necessary, click the blank table cell to the right of the path to select again.
Click the 'Execute' button to start the upgrade, and the device will automatically restart after the upgrade is complete.

Linux
There is no need to install the device driver under Linux, just refer to the Windows chapter to connect the device.
upgrade_tool
Download Linux_Upgrade_Tool, and install it into the system according to the following method for easy calling:
unzip Linux_Upgrade_Tool_xxxx.zipcd Linux_UpgradeTool_xxxxsudo mv upgrade_tool /usr/local/binsudo chown root:root /usr/local/bin/upgrade_toolsudo chmod a+x /usr/local/bin/upgrade_tool
Burn unified firmware update.img:
sudo upgrade_tool uf update.img
If the upgrade fails, you can try to erase and then upgrade.
# Erase flash To use the ef parameter, you need to specify the loader file or the corresponding update.img sudo upgrade_tool ef update.img #update.img: the ubuntu firmware you need to burn# Re-burn sudo upgrade_tool uf update.img
Burn partition image: Ubuntu (MBR), Android 8.1, use the following methods:
sudo upgrade_tool di -b /path/to/boot.imgsudo upgrade_tool di -k /path/to/kernel.imgsudo upgrade_tool di -s /path/to/system.imgsudo upgrade_tool di -r /path/to/recovery.imgsudo upgrade_tool di -m /path/to/misc.imgsudo upgrade_tool di resource /path/to/resource.imgsudo upgrade_tool di -p paramater #烧写 parametersudo upgrade_tool ul bootloader.bin # 烧写 bootloader
Ubuntu (GPT), use the following method
sudo upgrade_tool ul $LOADER
sudo upgrade_tool di -p $PARAMETER
sudo upgrade_tool di -uboot $UBOOT
sudo upgrade_tool di -trust $TRUST
sudo upgrade_tool di -b $BOOT
sudo upgrade_tool di -r $RECOVERY
sudo upgrade_tool di -m $MISC
sudo upgrade_tool di -oem $OEM
sudo upgrade_tool di -userdata $USERDATA
sudo upgrade_tool di -rootfs $ROOTFS
If an error occurs during the upgrade due to flash problems, you can try low-level formatting and erasing nand flash:
sudo upgrade_tool lf update.img # low-level format sudo upgrade_tool ef update.img # erase